
Eastern Palace Stalfos Spawn
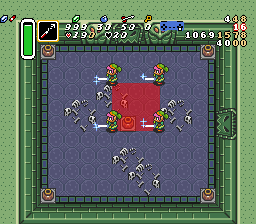
The four Stalfos spawns in this room are triggered as soon as Link enters the red rectangle shown in the above image, at which point the spawn points will be fixed. The four Link sprites show the furthest points away from the center that will still trigger the spawns. To be inside the rectangle, Link's horizontal coordinate must be within 1069 and 1098 and his vertical coordinate must be within 1549 and 1578. Note that this essentially encompasses a 3x3 square of the floor tiles.
Most of the strategies used in this room involve positioning the spawn points of one or more of the Stalfos inside obstacles or walls to prevent them from spawning. The Stalfos are also vulnerable before they "appear".
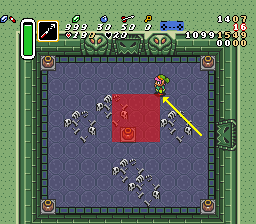
Because of the specific coordinates mentioned above, holding diagonally up-left out of the doorway will actually cause Link to miss the trigger rectangle by a single pixel. A possible strategy for triggering the Stalfos spawns at the upper-right corner (minimizing deviation from the ideal path to the door) is to diagonal up-left until this point, then take a brief step -- either left, down-left, or straight down.
The floor tile pattern can be used as a visual cue for remembering where this movement must be made, but alternative visual cues include the bones on the floor, or the sculpture on the top wall.
The typical strategy for this room using no equipment uses two pots to kill the left and right Stalfos spawns (the bottom spawn is blocked by the pot, and the top spawn is blocked by the north wall). Note that you may have to take a step right before throwing the second pot, depending on how far to the right you triggered the Stalfos spawns.
Many runners will only use cardinal movements to enter the trigger rectangle, but some time can be saved by using a diagonal movement instead, as well as moving slightly left before picking up the first pot.
Using the hookshot can save some additional time when walking to the pots.
This strategy uses only a single bomb and saves roughly half a second over the pot-only strategy. Lay and pick up the bomb as soon as you enter the room, tossing it against the right-hand wall to take out the right-hand Stalfos and using the pot for the Stalfos on the left.
These strategies are slower than alternatives provided below and are only recommended when attempting to preserve resources.
These strategies are all equivalent in time (except for sword beams which is slightly slower). Make sure to clear the top edge of the trigger rectangle before starting to walk left.
These strategies are generally the fastest ones available (minus the 3x beams strat), at the cost of using the most resources. As mentioned earlier, a small diagonal down-left movement can be used to step into the corner of the trigger rectangle.
For the fire rod strategy, a third rod shot cannot be used until the "flame" from the first shot is finished burning. For this reason, it is recommended to trigger the Stalfos spawns by moving down into the rectangle, and shooting the left Stalfos spawn last after a brief diagonal walk.
The 3x beams strategy shown here is not recommended due to being slower than the 2x beams strat above. Beams can also sometimes miss the Stalfos on the right and hit the wall instead depending on horizontal positioning.
| Strategy | Room Time (frames) | (mag adjust) | (1/2 mag adjust) |
|---|---|---|---|
| 3x Rod | 260 | 308 | 284 |
| 3x Arrow | 281 | ||
| 2x Arrow/Rod | 284 | 316 | 300 |
| 2x Beams | 292 | ||
| 3x Beams | 314 | ||
| 1 Pot + Arrow/Rod/Beams | 336 | 344 | 352 |
| 1 Bomb + 1 Pot | 357 | ||
| Hookshot + 2x Pot | 365 | ||
| 2x Pot | 381 |
The above chart shows a rough comparison, from fastest to slowest, of the above room strats. (Actual frame timings can and will differ depending on execution) For the fire/ice rod strategies, note that each rod shot will consume 16 magic, which can result in up to a 16-frame time loss at an end-of-dungeon cutscene (or half that amount, with half magic), depending on missing heart count.