
Ganon's Tower Randomizer Room
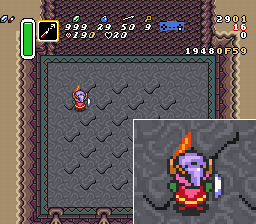
The exploding wall is triggered by stepping on the top-most "cracked" tile in the first column. Link's horizontal coordinate must be between 1939 and 1948 to trigger the switch. The above image shows Link standing on the lower-right corner of the switch trigger for reference.
Doing a long upward dash to trigger the switch and then reach the torch is faster than walking and then using the hookshot. When using the hookshot (if the boots are not available, for instance), keep in mind that you'll need to walk upward betwen 0 and 15 pixels after triggering the floor switch, depending on where you stepped onto it.
Certain random enemy movement patterns can potentially hit you out of a dash here, but this is unreactable for the most part.
The four chests in the room are typically opened in clockwise order, starting from the lower-left chest (closest to the floor trigger) and ending with the lower-right chest (closest to the exit). The time difference between walking around the left or right side of the first chest is negligible, so this is mostly up to personal execution preference.
After opening the final chest, holding right and doing a dashturn (instead of walking downward to start your dash) will give you a (frame-perfect) chance at being perfectly aligned with the door after dashing downwards. Doing another dash to exit the room can save up to 9 frames over walking, assuming that the minimoldorm does not interrupt your dash charge.